Tasmanian photographer James Kerstan toured New Zealand earlier this year in a Wilderness motorhome. Here he gives us his tips on planning a photography trip in New Zealand.
On my recent adventure with Wilderness Motorhomes I faced some pretty varying weather conditions. As a photographer, I’ve learnt over the years how to predict, plan and shoot in all sorts of weather conditions. I’m going to share with you a few tips that I personally used to plan out the photos that I took on my New Zealand trip with Wilderness Motorhomes.
On this trip I had a very relaxed itinerary with a lot of room to move and this worked perfectly with the shots that I wanted to get. I started off the trip with a bit of astrophotography and this is how I planned my shoot.
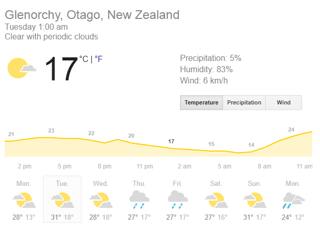 My first step in planning after choosing a location would be to look at the local weather forecast for that particular location. There are plenty of different tools and resources that people use to check the weather forecast but I’ve found that the simplest and often most accurate tool that works for me is Google. It may sound crazy and too simple but I just Google search the location with the word ‘weather’ at the end. This will bring up Google’s hourly forecast. For example I searched “Glenorchy weather” to bring up the following results. I clicked on the different times which revealed what the weather is doing. For astrophotography, I’m looking for anything that’s clear or clear with periodic clouds as it will have the best results for seeing the Milky Way.
Note: I should note that this technique is best used on a mobile device (but can still be used on a desktop) and for the best accuracy it should be used within 24 hours of the time that you’re planning on going to that location.
 Once I’ve checked that the weather matches what I’m after, I’ll then use an app called PhotoPills to plan my shoot. PhotoPills is a great resource for photography and I use it almost every time I go out and shoot. The app has everything from where the sun is going to rise/set to live augmented reality of the Milky Way’s position in the sky.
On this occasion I pinpointed the Glenorchy pier, set the marker and checked where the Milky Way would be and at what time. From the example screenshot I had the pin placed on the Glenorchy pier and the white line going through the dots is a representation of where the Milky Way core would appear. At the bottom of the map is the displayed time representation of the Milky Way’s positions on the map. On this screenshot you can see that at 1:46 AM the Milky Way core lined up perfectly with the pier and the top of the snow-capped mountains. It was all set up for success and now was time to put the planning in action and get out there and shoot!
After a short 45 minute drive from Queenstown and a late night, I was ecstatic that my planning had paid off and I was able to get the shot that I was after! Having the motorhome made it even easier as I was able to freedom camp in the local pub’s car park and only travel 2 minutes from the pier before I could have a rest and sleep.
Hopefully these resources will allow you to have a better understanding of the weather conditions that you will face and will give you the confidence in planning your future Wilderness shots! Make sure that you tag #wildernessnz in your photos so they can follow you along your journey!